
Dissecting the BMW NBT EVO HU Boot Process - Part 1: QNX and the IFS
For the past 2-or-so years, I’ve been hacking on my car’s infotainment unit - the BMW NBT EVO HU. It’s the slightly-beefed-up version of the original NBT HU, and runs QNX 6.5.0 for an operating system.
I figured this would be the perfect opportunity to dive into a new topic: What does the boot process of a modern QNX-based infotainment unit look like?
Throughout this post, we’ll start with the most basic steps of the QNX boot process, the IFS image, and wrap at Harman’s custom ‘starter’ binary and configuration file (which launches over 100 application-specific processes on the unit!).
Getting Started
Well, when you want to learn how a system boots, where do you start? From basic OSINT research (aka: Googling It) we know that this system runs the QNX operating system, version 6.5.0. And we’re in luck! The QNX SDP 6.5.0 documentation has a great chapter on the OS boot process - I’ve included their diagram below.
The QNX boot process, as described by the QNX SDP 6.5.0 documentation.
Now, this doesn’t show everything - we’ll still have to dive into all of the weird automotive and BMW-specific tweaks to this thing. Onwards!
The Early QNX Boot Process - PLL & IPL
Now, when I say the “early” boot process, what I mean is PLL and IPL. From a reverse engineering or security analysis standpoint, this is a difficult area of the boot process to get info on!
PLL - Phase Locked Loop
Per the QNX documentation, they say: “PLL refers to how long it takes the first instruction to begin executing after power is applied to the processor.”
Okay, that’s simple enough - no BMW-specific code happening yet, so it’s not super interesting to me. Lets skip to the IPL.
IPL - Initial Program Loader
Again, per the QNX documentation:
“The IPL performs the fewest steps necessary to configure the memory controller, initialize the chip selects and/or PCI controller, and configure other required CPU settings."
BUT, it’s the NEXT function of the IPL that we care the most about!
“Once these steps are complete, the IPL copies the startup program from the image filesystem (IFS) into RAM and jumps to it to continue execution.”
Huzzah! This IFS is a file we have on hand, so I can dive right into the analysis.
Now, before we jump into that: Unfortunately, the IPL is likely a mixture of QNX code and TI OMAP5432 BSP code. Because I don’t have access to either of these at the moment, it’s a bit hard to reverse engineer…
Side Note: BIOS & the OMAP5432 BSP
I’m hoping to dive more into REing the early portions of the boot process at some point in the future. My thought is that the NBT EVO’s IPL might be the Harman-created “HBBIOS” BIOS packet, named “arm-cortexA15_bios_packet.bin” on the device’s filesystem. Maybe if I could get access to the OMAP5432 BSP it would be a bit easier to RE…
Startup and the IFS!
Okay, we’re officially out of the early portions of the boot process, and into the juicy “startup” portion of the boot process!
Now here, the Initial Program Loader is looking to copy the “startup” program from the device’s Image Filesystem (IFS). This may lead you to ask…
What’s an IFS File?!
I’m glad you asked! IFS stands for “image file system”, and is essentially a minimal OS image that contains the QNX kernel and all of the drivers and files that your system needs to boot.
To get an idea of the kinds of things usually included in a device’s primary IFS file, we can take a look yet another shiny graphic from the QNX documentation:
As you can see here, not only does the IFS file usually contain the “base system” (the QNX kernel and other core OS libraries, like libc), but it also often contains:
Display drivers
Screen binaries
Screen configuration files
Splash screen binaries
Splash screen resources
Or, other binaries that the developer wants to boot up immediately with the OS!
Because of this, if you extract an IFS file, you usually find a small number of binaries, drivers, shared libraries, and other early-start-up goodies.
Where is the IFS?
Of course, now that we know what an IFS file is, it begs the question: Where the hell is the IFS on an NBT EVO?
Simple Answer: /dev/sda0t4
The device’s IFS files are located next to the BIOS packet and a mysterious “A666” file…
That’s right - it’s just located in a different partition on the main flash storage for the TI OMAP processor, as far as I’m aware.
Wait, why are there two IFS files?
Yes, yes, this is a great question - why are there two IFS files on the NBT EVO? Is it some sort of primary and secondary IFS?
Let me answer that with one screenshot:
I ran sha256sum on both of the IFS files. The hashes were identical.
Both of those SHA256 hashes are identical! Therefore: There’s no difference at all between the two IFS files.
My guess is they may have included two IFS files for redundancy/resiliency, or possibly so that one could be swapped out as part of an update routine (ie: update one while maintaining the old one in case of failure). To be honest, I’m not entirely sure - if you know, I’d love to learn.
Dumping the IFS Contents
So, we now know what the IFS, and where the IFS is. But: What’s in the NBT EVO IFS??
To figure this out, we can dump the contents of boot1.ifs! How? Well, if you’ve read Extracting QNX IFS Partitions… (not-so-subtle plug)
Kidding, I won’t make you go read it. If you use a combination of dumpifs + the dumpifs-folderized script, you should be able to dump all of the contents without issue. I’ve included the output of this script below:
Using dumpifs allows us to extract everything from boot1.ifs, plus it all gets nicely copied into the proper folder tree!
If we run the tree command on the resulting directory structure, it’s a bit easier to parse visually:
The contents of the boot1.ifs file.
Okay, so in total we have:
16 binaries (/boot/bin)
1 script (v850commander.sh)
8 shared libraries (/boot/lib)
1 QNX kernel (/proc/boot/procnto-smp-instr)
1 QNX boot script (/proc/boot/.script)
A few small misc files (nbt_version.txt, server.cfg)
Overall, a pretty simple IFS! Now then, lets dive into the meat of it.
The QNX Micro Kernel
One of the most important parts of the boot1.ifs file is the QNX micro-kernel itself. This file is stored at /proc/boot/procnto-smp-instr.
We don’t need to dive into it too much, because it’s use case is pretty much written on the packaging… this is the QNX kernel, it does QNX things. If we’re curious about BMW or Harman-specific modifications to the underlying system, this likely isn’t where we’ll find them!
Digging for Kernel Metadata
That being said, we can still grab a few pieces of useful info, like the versioning and when it was compiled. To do that, I just ran it through the ‘strings’ utility:
Lots of miscellaneous strings in the kernel, BUT right near the bottom of that image, you can see:
2015/12/01-11:00:56EST
6.5.0
This gives a pretty string indication that this is a QNX 6.5.0 kernel (as expected), which was compiled in 2015-12-01 @ 11:00:56 Eastern Standard Time. Interesting!
Considering we have other files on this unit that date from 2018 through the 2020s, this is a pretty old kernel. Perhaps the system’s IFS or kernel isn’t updated through patches like other portions of the system, for stability reasons? Unsure!
The Startup .script
Once the kernel finishes its initializations, it looks for the startup script, which can be found at /proc/boot/.script on the NBT EVO. Running ‘file’ on the script, my system isn’t sure what to make of it - but running ‘cat’, and sure enough, there are loads of strings.
The contents of the startup script are… difficult to read, to say the least.
Okay, so we have a giant clusterfuck of text. How do we parse this?
Well, to start, lets learn what a QNX boot script even is. Going back to ye olde bible, aka the QNX 6.5.0 SP1 documentation, they say:
“The boot script portion of a buildfile contains the sequence of commands that the Process Manager executes when your completed image starts up on the target.”
So essentially, you can think of this boot script as a basic shell script that’s executed by the kernel immediately after boot. You can do things like set up symbolic links, print status messages to the terminal, start loggers or debuggers, execute startup programs, initialize displays or networking, etc.
And sure! It vaguely looks like a shell script - but you can see that the line breaks and separation of commands are all messed up. However, if we pop it into xxd to view it as a hex dump, we get some hints as to what may be going on:
In the hex dump, you can see that there appear to be file paths separated by null bytes. And after each command, it seems to be followed with a full list of variables for the environment it is executed in. This pattern continues a few times in the file.
I did a bit of research on this file format, and ended up writing a Kaitai Struct parser for the format to make reverse engineering it a bit easier - you can find that on my GitHub.
The kaitai struct interface - the editor is in the upper left, output in the bottom left, and our hex dump on the right!
Using this parser, we can take a peek at the entries in the boot script! I’ll go through each of the entries I was able to extract below.
Step 1: Setting up Symlinks
The first thing the script does is set up a number of symbolic links. These are pretty basic:
/boot/bin/ksh -> /bin/ksh
/boot/bin/ksh -> /bin/sh
/lib/libsocket.so.3 -> /lib/libsocket.so
Not much to see here, essentially some house-cleaning, haha. Onwards!
Step 2: Setting up the System Logger
Our first command! Once the symlinks have been set up, the first thing the system does is launch the “slogger” binary. On QNX systems, slogger is the “system logger”. You’ll never guess what I’m about to quote… the QNX documentation.
“The system logger, slogger, is the central manager for logging applications’ system messages. It maintains these messages in a circular buffer, allowing them to be read later or in real time.”
Well, simple enough! It’s a logger, and it logs system things. I guess that’s in the name, eh?
Parsing out the full list of args, we get the following:
slogger -m -u 110 -s 1024k
Breaking them out, that’s:
-m = Using CLOCK_MONOTONIC instead of CLOCK_REALTIME as the clock source.
-u 110 = Generate a user-string trace event with the ID of “110” for all messages received.
-s 1024k = Set the log buffer size to 1024 kilobytes.
Overall, pretty basic! Not too much to see here, just a basic logging setup.
But now, you may be curious: What’s up with that massive wall of environment variables?!
Well, it’s about what you’d expect - to set up the execution environment, QNX allows you to specify any environment variables you’d like to define to configure the local environment. In our case, we have 28 total values. Broadly speaking, they just… configure the local environment!
For the sake of transparency, I’ve included the full list of them in the appendix at the end of this post.
Step 3: A Quick “Wait For” Check on the Console
Before moving on to the next command, we run into a “wait for” entry. These entries are simple - the system will perform a stat() call on the given pathname, and sleep for 100ms if it doesn’t succeed. This repeats until it succeeds, or until it times out.
In this case, the path we’re waiting for is /dev/console. This makes sense for this step in the boot process, because our next binary relies on the console device!
Step 4: Launching the Character Device Driver
Our next command! Checking the args, we have:
devc-seromap -u1 -e -F -b115200 -c48000000/16 0x48020000^2,106
Okay, “devc-seromap” - what does it do?
On QNX systems, the naming scheme “devc-ser*” is used for any serial device driver binary. In this case, the driver is called “devc-seromap” because it’s the “devc-ser” serial device driver for the “OMAP” board! Combine the two, and you get “seromap”!
We can also confirm this by dumping the .QNX_info section of the ELF binary, using the following command:
readelf -p QNX_info devc-seromap
Easy, just like that we have a full description of the binary! “Character device driver for the OMAP 1510/5910 UART”. We can also see by the TAG ID that it was most likely distributed as part of the Texas Instruments Board Support Package (BSP): “BSP_hbas-ti-omap5-emodule_br-650_be-650sp1_717891_15”.
Could be an interesting driver to poke at the security of, but for now, we’ll move on. Oh, and the environment was identical to the previous command - so I’m skipping over that!
Step 5: Reopen the Serial Interface
A quick “reopen” is performed on /dev/ser1. Per the QNX documentation, reopen does the following:
“Redirect standard input, standard output, and standard error to the specified device.”
Pretty simple - we’re just piping all of our text, logging, etc. out over /dev/ser1 now! In the QNX device naming conventions, “ser1” should be the device’s main serial interface.
Step 6: Launch the MMC/SD Driver
Next, a few messages are printed to the serial console, and the MMC/SD driver is started. This driver allows the device to read from eMMC flash storage, which is the main type of storage that the device uses!
QNX: 650SP1 on OM5 - BMW NBTevo HU
starting mmc/sd driver…
devb-sdmmc-omap5evm blk cache=1M,vnode=512,marking=none,noatime,lock,normv,maxio=256,verbose=bf disk maxio=256,name=sda cam quiet,cache,async sdio hc=omap,addr=0x480b4000,irq=118,timing=~hs200,verbose=3
WOW! This binary has a whole myriad of arguments. If you look closely, they’re separated into four main chunks: blk arguments, disk arguments, cam arguments, and dsio arguments. We’ll go through them chunk-by-chunk…
blk - The “blk” options control the io-blk.so driver, which is used for block-based input/output operations
cache=1M - Disk buffer cache size of 1 megabyte
vnode=512 - Number of vnode entries (filesystem-independent inodes)
marking=none - Sets the filesystem-dirty marking behavior (in this case, marking is disabled)
noatime - Don’t update the file’s directory entry if the only change is the access time.
lock - Lock removable media (the medium is treated as fixed)
normv - Don’t allow invalid mounts on removable media (re-insert)
maxio=256 - Limits the size of I/O requests that io-blk.so composes anbd hands over to the cam-disk.so library, expressed in number of disk sectors.
verbose=bf - Configures which output is sent to the system logger. B = bad blocks, f = fsys module.
disk - The “disk” options control the cam-disk.so driver
maxio=256 - Allow I/O writes and reads of at most 256 sectors
name=sda - Specify the device prefix - sda names the devices /dev/sda0, /dev/sda1, etc.
cam - The “cam” options control the libcam.so driver
quiet - Be quiet, don’t display any information on startup
cache - Enables the cache
async - Enables the performing of CPU cache invalidation after an I/O operation in a thread that’s separate from the one that’s notifying the upper layer.
sdio - The “sdio” options control the driver’s interface to the SD/MMC host controller
hc=omap - The name of the host controller
addr=0x480b4000 - The address of the interface
irq=118 - The interrupt used by the controller
timing=~hs200 - Sets the timing used. “HS200” is an SD/MMC timing mode described by the (proprietary) SD specification
verbose=3 - Sets the SDIO verbosity level
Step 7: A quick “wait for” on the disk
Now that we set up the SD/MMC driver, what’s next? Waiting for the disk to initialize, of course!
We have a quick “waitfor” command here that waits for /dev/sda0 to be accessible before continuing.
Pretty simple, just waiting for the disk to come up!
Step 8: Starting sysinit
FINALLY, WE’VE MADE IT! To what, you ask? A Harman binary! (I think).
The full command + arguments:
starting sysinit…
sysinit -t315532800 -rdma=0:0,dma=2:5,dma=8:10,dma=18:31 -o 0x4a208040:0x1 -o 0x4a20808c:0x0 -o 0x4a208040:0x0 -g
Now, what makes me say it’s a Harman binary? Well, three things:
There isn’t any QNX documentation on a binary named ‘sysinit’
Upon dumping the QNX_info section, we can see it was compiled by a Harman build machine named “DEMUWSP501” by a user named “BMW_L6_SW_Integratio”
Upon dumping the strings, we can see many NBT EVO-specific things, such as application directories and references to “istep”.
Unfortunately, this also means that documentation is nonexistent - time to pull out Ghidra to figure out what these options are!
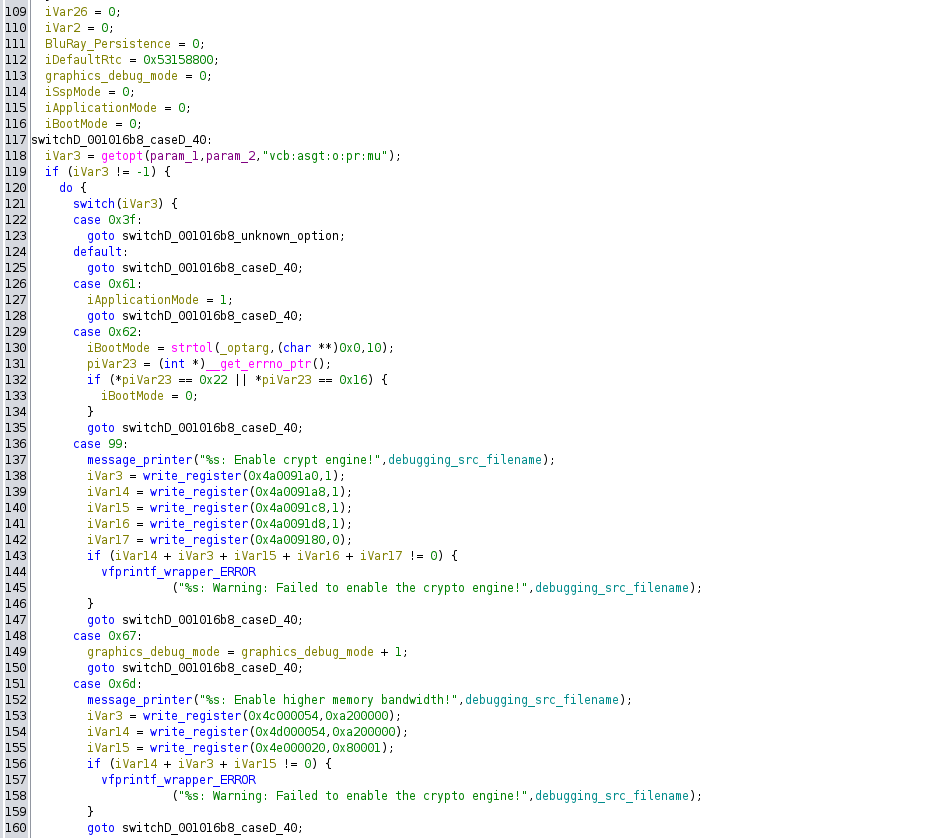
The main option flag handling switch statement within the sysinit binary.
Luckily for us, this binary had quite a few debugging statements left in the production code. Using these, I was able to figure out the following:
-t315532800
This flag sets the default Real Time Clock starting value to 315532800
-rdma=0:0,dma=2:5,dma=8:10,dma=18:31
This flag allows for the setting of resource database entries. TODO
-o 0x4a208040:0x1 -o 0x4a20808c:0x0 -o 0x4a208040:0x0
These flags are used to set the values of specific system registers. The format is: [address]:[value]
-g
This flag is used to enable the Screen Debug Mode, but also requires a file located at /var/opt/sys/GRAPHICS_DEBUG
A full list of decoded arguments has also been included in the appendix at the end of this post.
So, the logical next question: What does the binary actually do? As a tl;dr, I would describe it as: initializing the system. A bit obvious from the name ‘sysinit’, in retrospect…
It can set up the system in different ways depending on the system’s boot mode, the currently active bootloader, and whether or not the system is booting in “SSP Mode”.
If SSP mode isn’t enabled, the start of the boot looks something like this:
Fetch the current boot mode
Fetch the currently-active bootloader
Mount /dev/sda0t179 at /fs/sda0
Symlink /fs/sda0 to the system’s root directories
Ex: /fs/sda0/bin -> /bin, /fs/sda0/lib -> /lib, etc.
Mount /dev/sda0t178 at /fs/sda1
Symlink /fs/sda1 to /var
If SSP mode is enabled, it’s a bit different:
Instead of the root directories being symlinked directly to /fs/sda0, the “istep” repository directories are used instead
This makes the system’s root /fs/sda0/repository/istep/
I believe this is done for the purpose of software upgrades
SSP could mean Secure System Provisioning, Secure Secret Provisioning, etc. - essentially, it would mean the system is being booted in a firmware upgrade mode.
Next, the binary checks for something called “BluRay Persistence”. If enabled, it will mount /dev/sda0t181 to /fs/sda4, and then symlink that to /mnt/bdpersistence.
This BluRay Persistence mount is later used by the script /opt/mm/bin/prepare_and_start_up_media.sh, as part of the launch process for the PrepareMedia and NBTMediaMainApp services. We’ll have to dive further into this later!
Next, the system checks the system’s boot mode, as well as which bootloader is currently active. Based on the results of this, it does a bit more mounting and symlinking of filesystems:
Mounts /dev/sda0t177 at /fs/sda31
Optionally mounts /dev/sda0t180 at /fs/sda32
Symlinks either /fs/sda31 or /fs/sda32 to /fs/sda3 (depending on boot mode, boot loader, etc.)
Optionally symlinks /fs/sda32 to the system’s root filesystem if iApplicationMode = 0 and iSspMode = 0
Next, we set up a partition called “proddata”:
Checks if /dev/sda0t4 exists
If not, checks if /dev/sda0t12 exists
If neither of these exist, we fail out and exit
Mounts one of the two to /fs/sda2
Symlinks /fs/sda2 to /mnt/proddata
Second to last step: Checking if graphics debug mode is enabled!
If graphics debug mode is enabled:
Symlink /lib/graphics/omap5432_ES2_0-debug to /lib/graphics/omap5432
If graphics debug mode ISN’T enabled:
Symlink /lib/graphics/omap5432_ES2_0 to /lib/graphics/omap5432
And our final step: One last symlink
Symlink /bin/ducati-m3-core0_es2.xem3 to /bin/ducati-m3.bin
And that’s it! With that, our sysinit has been completed.
A flowchart of the sysinit binary’s inner workings (click for full res)
If you’re looking for the FULL details on how sysinit works, I created a flowchart that essentially has every decision and path possible through the binary, lol. You can open the PNG above for the full-res image! (Or send me an email if that’s not working, I’ll throw it on Github or something)
Step 9: The DSP Register Logger
Next up, we have the ‘DSP Register Logger’, AKA the binary ‘gs’. It’s run with the following command:
gs /boot/bin/memcpy_utility.out
This is one of my favorite binaries in the boot process, for a simple reason: It contains smileys!
A dump of strings from the gs binary. I enjoyed the :-( and :-/ faces
My only request is that next time, smiley faces are used as well - it can’t all be sad.
The gs binary appears to start communications with the Digital Signal Processor (DSP) portion of the device, a Texas Instruments TMS320C6x. It only has a single function (main), and all it does seems to be (roughly):
Load an ELF file intended for execution on the DSP
Establish communications with the DSP
Map a bit of memory?? (And likely load the ELF onto the DSP?)
I’m not 100% clear on this part, if I’m being honest
Print the various statuses/registers of the DSP
Even when decompiled with Ghidra, the entire main() function is only 220 LoC! A pretty simple binary overall.
The ‘memcpy_utility.out’ binary that it copies over to the DSP is also quite interesting! Checking it with file, we can easily see that it’s intended for execution on the DSP itself:
memcpy_utility.out: ELF 32-bit LSB executable, TI TMS320C6000 DSP family, version 1 (SYSV), statically linked, with debug_info, not stripped
The last tidbit there - “not stripped” - is also quite juicy! That means it should be easy to take a crack at this binary with Ghidra and learn quite a bit about it and the DSP.
That being said, analyzing the DSP is a bit outside the context of this blog post… If you’d like to learn a bit more and dive into the TI TMS320C6x world, I found a great PDF put out by TI titled: TMS320C6x Peripheral Support Library Programmer’s Reference. Very helpful!
Step 10: Starting the Starter… (Process Launch Manager)
We’re now at the second to last step - starting the ‘starter’ binary. Before we even begin looking at the arguments, it’s important to see the path it’s executing from:
/opt/sys/bin/
Guess what that means? We’re officially out of the IFS!
That’s right, this essentially marks the end of our process through the boot script. While there’s still one more step (the login binary), at this point we’re executing binaries located on the main EFS filesystem of our device - no longer things built into the IFS itself.
This is a great sign that the system is almost fully booted, so the binaries from here on out will be much more focused on the application layer of the device, rather than performing basic setup steps like mounting raw flash storage or setting up peripherals.
Anyways, on to the binary! This one has quite a few arguments:
starter -A -s -e -g -vvv -p 30 -S libnbt_starter_plugin-omap.so -O -verbose=3,transferverbose=3 -c /opt/sys/etc/starter.cfg
Luckily, this binary will be easy - upon dumping the strings from it, I found it contained a full helptext with information on all of the arguments that can be passed to the binary. They call the binary:
Service Starter QNX - Process launch manager (version core 5.16.2)
Breaking down the binary’s launch options, we have:
-A
Activate new interpretation of aps partitions for subconfigs
-s
Show status at termination on stdout
-e
Send error output to slog (default stderr)
-g
Send debug output to slog (default stdout)
-vvv
Increase verbosity level (x3)
-p 30
Set priority level of this process
-S libnbt_starter_plugin-omap.so
Load early syset library
-O
Options for presyset library
-verbose=3,transferverbose=3
These options are used for the presyset library
-c /opt/sys/etc/starter.cfg
Full path to XML configuration or binary file
Some of these are fairly obvious (increasing verbosity, setting priority, etc.) but others (like “activate new interpretation of aps partitions”) are currently meaningless to us.
To dive further into what the starter binary actually does, our first mission is finding it. From the launch command, we know the path should be /opt/sys/bin/starter. On my system, that was located within the sda0t179 partition.
Sure enough, the starter binary was in /sda0t179/opt/sys/bin/
This made the binary easy enough to pop into Ghidra. Lucky for us, the binary had many helpful debugging messages, so it was easy to get a general gist of how the process works.
The main functionality of the binary is based around parsing the starter configuration file. As you can see from the command-line arguments, the one used in the NBT EVO’s boot lives at /opt/sys/etc/starter.cfg.
The beginning of the starter.cfg file.
The starter configuration file is 6089 lines in total length, and describes all of the services, packages, and binaries that are started as part of the application layer boot process. I use the term ‘application layer’ pretty loosely here - essentially, I mean these are Harman-developed services that do car things. Communication frameworks, the HMI UI, navigation binaries, all of that kind of stuff!
The configuration file is written in XML, and uses a number of custom tags to define the various entries in the file. As you can see from the screenshot, at the top of the file they list the total number of entries for each entry type in the file. That means within our configuration file, we have:
4 total Domains
8 total Partitions
4 total DomainPartitions
124 total Processes
71 total Interfaces
39 total Environments
80 total Packages
While I won’t dive TOO in depth quite yet, I’ll provide a few examples of each of these items.
Domains
There are four Domains within the file:
Connectivity
/opt/conn/bin/Connectivity.cfg
Media
/opt/mm/etc/Media.cfg
NavigationEceUsa
/opt/nav/eceusa/bin/NavigationEceUsa.cfg
NavigationAsn
/opt/nav/asn/bin/NavigationAsn.cfg
Each of these ‘Domains’ is essentially a secondary starter configuration file, specific to some section of functionality within the car - connectivity, media, or navigation (divided by region). These domain files have their own processes, interfaces, environments, and packages, just like the main starter.cfg file.
Partitions
There are 8 total Partitions within the file, each with a defined “Budget” integer.
System
Budget: 30
softrt_CONN
Budget: 1
softrt_NAV
Budget: 1
interaction
Budget: 60
softrt_SYS
Budget: 5
softrt_MME
Budget: 1
bulk
Budget: 1
softrt_SPEECH
Budget: 1
While I’m not 100% clear on what the “budget” variable is used for, I believe it has something to do with the adaptive partitioning service. The above numbers add up to a total of 100% (30 + 60 + 5 + 1 + 1 + 1 + 1 + 1), so I have a feeling it’s something like the percentage of free space each partition is allowed to use…? Not entirely sure!
DomainPartitions
This one is pretty basic. Essentially, this is just a list that pairs up each Domain to one of the previously-defined Partitions! There are 4 total, one for each domain.
Domain: Connectivity
Partition: softrt_CONN
Domain: Media
Partition: softrt_MME
Domain: NavigationEceUsa
Partition: softrt_NAV
Domain: NavigationAsn
Partition: softrt_NAV
Processes
Processes are one of the most obvious items listed in the startup configuration file. They define a process by its number, name (path), arguments, priority, and more. Example:
<Process>
    <Number>23</Number>
    <Name>/opt/tuner/bin/TunerAppSdars</Name>
    <WorkingDir/>
    <EnvFile/>
    <Args>--mapTunerStarter.DSYSOnOff=SiriusTunerStarter.DSYSOnOff --trccachesize=2500 --bp=/opt/tuner/etc --bp=/var/opt/mm --heartbeat-interval=2</Args>
    <ResArgs>--mapTunerStarter.DSYSOnOff=SiriusTunerStarter.DSYSOnOff --trccachesize=2500 --bp=/opt/tuner/etc --bp=/var/opt/mm --heartbeat-interval=2</ResArgs>
    <Prio>10</Prio>
    <Partition>softrt_MME</Partition>
    <StartParam>BACKGROUND</StartParam>
    <OnTerminate>RESTART_ON_ERROR</OnTerminate>
    <Shutdown>IGNORE</Shutdown>
    <ShutdownThread>-1</ShutdownThread>
    <KeepInterface>false</KeepInterface>
    <MaxProcessRestarts>5</MaxProcessRestarts>
    <FinalAction>SHUTDOWN_SYSTEM</FinalAction>
    <VariantCode>80000040</VariantCode>
    <VariantMask>80000040</VariantMask>
    <ProvidesInterface/>
    <RequiresInterface>52</RequiresInterface>
    <ProvidesTimedInterface/>
    <RequiresTimedInterface/>
    <RequiresEnvironment>0</RequiresEnvironment>
    <HighMem>true</HighMem>
</Process>
Interfaces
Interfaces appear to represent device files on the system. They define the availability timeout for each device, as well as the number, name, type, and check interval. I’ve included a few examples of interfaces in the code block below.
<Interface>
   <Number>32</Number>
   <Name>/proc/mount/dev/qnxcomm</Name>
   <AvailabilityTimeout>-1</AvailabilityTimeout>
   <Type>device</Type>
   <CheckInterval>0</CheckInterval>
</Interface>
<Interface>
   <Number>33</Number>
   <Name>/proc/mount/dev/pf</Name>
   <AvailabilityTimeout>-1</AvailabilityTimeout>
   <Type>device</Type>
   <CheckInterval>0</CheckInterval>
</Interface>
<Interface>
   <Number>34</Number>
   <Name>/proc/mount/dev/random</Name>
   <AvailabilityTimeout>-1</AvailabilityTimeout>
   <Type>device</Type>
   <CheckInterval>0</CheckInterval>
</Interface>
Environments
Environments are somewhat straight forward - they appear to represent environment names and values. Pretty basic! I’ve included a few examples below.
<Environment>
    <Number>1</Number>
    <Name>COMMON_MALLOC_ARENA_SIZE_HIGH</Name>
    <EnvName>MALLOC_ARENA_SIZE</EnvName>
    <Value>65536</Value>
    <Overwrite>1</Overwrite>
</Environment>
<Environment>
    <Number>2</Number>
    <Name>COMMON_HB_HEARTBEAT_INTERVAL</Name>
    <EnvName>HB_HEARTBEAT_INTERVAL</EnvName>
    <Value>2</Value>
    <Overwrite>1</Overwrite>
</Environment>
<Environment>
    <Number>3</Number>
    <Name>System_OMAP_GRAPHICS_ROOT</Name>
    <EnvName>GRAPHICS_ROOT</EnvName>
    <Value>/lib/graphics/omap5430</Value>
    <Overwrite>1</Overwrite>
</Environment>
Packages
Packages appear to be collections of processes that can be launched together - essentially, entire system services. They can also require other packages to be launched first, and can be configured with actions to be taken when the package is first launched, or once it exits.
<Package>
    <Number>19</Number>
    <Name>APP_NATP</Name>
    <RequestState>STOP</RequestState>
    <RTVariantDependent>true</RTVariantDependent>
    <StartEntryAction>
        <Action>NO_ACTION</Action>
        <Param></Param>
    </StartEntryAction>
    <StopEntryAction>
        <Action>NO_ACTION</Action>
        <Param></Param>
    </StopEntryAction>
    <StartExitAction>
        <Action>NO_ACTION</Action>
        <Param></Param>
    </StartExitAction>
    <StopExitAction>
        <Action>NO_ACTION</Action>
        <Param></Param>
    </StopExitAction>
    <HostsProcess>24</HostsProcess>
    <HostsProcess>25</HostsProcess>
    <HostsProcess>26</HostsProcess>
    <HostsProcess>27</HostsProcess>
    <RequiresPackage/>
</Package>
In the above example, the package is named “APP_NATP” and it hosts four processes:
Process Number 24
/opt/speech/bin/enluservice
Process Number 25
/opt/speech/bin/natp
Process Number 26
/opt/speech/bin/natp (Japanese)
Process Number 27
/opt/speech/bin/vrs_natp
To find the path and information about each process, you just have to look for the <Process> tag matching the number listed in the Package.
The Next Steps…
Unfortunately, this is where I’ll end the blog post for today.
Part 2 of this post will be a deep dive into the structure of the starter configuration file, going through each of the application layer Harman services and proceeding further into the device’s boot process.
Conclusion
If you’ve made it this far, I want to thank you for reading - this post was long and drawn-out, but I hope the in-depth information on a modern infotainment unit was useful to someone! I enjoy hacking on this kind of stuff for fun in my free time, so it feels great to be able to share it with the world.
Oh, and a shout-out to the engineers at Harman for making a great module. It’s been a blast to reverse engineer and learn about, and the one in my car works great!
And on that note: To everyone, thank you for reading, and happy hacking!
Appendix
This section holds all of the miscellaneous raw data that I dumped in the earlier sections, just to make it easier to copy and paste or search some of it. Enjoy!
Yellow header color: #ffd300
Boot Script Data
Note: This is my reverse engineered “cleartext” version of what the boot script likely looks like before compilation.
[+script] startup-script = {
    procmgr_symlink /boot/bin/ksh /bin/ksh
    procmgr_symlink /boot/bin/ksh /bin/sh
    procmgr_symlink /lib/libsocket.so.3 /lib/libsocket.so

    slogger -m -u 110 -s 1024k

    waitfor /dev/console

    devc-seromap -u1 -e -F -b115200 -c48000000/16 0x48020000^2,106

    reopen /dev/ser1

    display_msg QNX: 650SP1 on OM5 - BMW NBTevo HU

    display_msg starting mmc/sd driver...

    devb-sdmmc-omap5evm blk cache=1M,vnode=512,marking=none,noatime,lock,normv,maxio=256,verbose=bf disk maxio=256,name=sda cam quiet,cache,async sdio hc=omap,addr=0x480b4000,irq=118,timing=~hs200,verbose=3

    waitfor /dev/sda0

    display_msg starting sysinit...

    sysinit -t315532800 -rdma=0:0,dma=2:5,dma=8:10,dma=18:31 -o 0x4a208040:0x1 -o 0x4a20808c:0x0 -o 0x4a208040:0x0 -g

    display_msg starting DSP register logger...

    /boot/bin/gs /boot/bin/memcpy_utility.out

    display_msg starting starter...

    /opt/sys/bin/starter -A -s -e -g -vvv -p 30 -S libnbt_starter_plugin-omap.so -O verbose=3,transferverbose=3 -c /opt/sys/etc/starter.cfg

    /boot/bin/login
}
Reverse Engineered sysinit Arguments
This is the full list of arguments that I reverse engineered from the ‘sysinit’ binary. If you want to check the switch case out for yourself, it was in the function located at 0x00101610 in the binary!
-a - Sets application mode to 1
-b [boot mode] - Boot mode selection. Valid options are 1 or 2.
-c - Enable the crypto engine.
-g - Enable screen debug mode (GRAPHICS_DEBUG) - requires file at /var/opt/sys/GRAPHICS_DEBUG
-m - Enables higher memory bandwidth
-o [address]:[value] - Writes the given value to the specified memory address
-p - Enables persistent BluRay mounting @ /mnt/bdpersistence
-r - Allows for the setting of up to 10 resource database entries. mem, irq, ioport, dma, pcimem (TODO)
-s - Sets iSspMode to 1 (todo)
-t [rtc] - Allows setting the real-time clock (RTC) value (default: 0x53158800, aka 1393920000)
-u - Changes “USB drive strength”, aka USB termination resistance (via OMAP5 “TERMINATION_CONTROL” register)
-v - increments _DAT_001054dc (todo)
Starter Binary Arguments
This help text was found within the starter binary itself, and describes all of the optional arguments that can be used when launching starter.
starter - Process launch manager (version core 5.16.1)
starter -c filename.cfg [options] &
Options:
 -c path      Full path to xml configuration file or binary file
 -h           Help message
 -o           Observe daemons
 -p number    Set priority level of this process
 -v           Increase verbosity level
 -g           Send debug output to slog (default stdout)
 -e           Send error output to slog (default stderr)
 -d           Enable debug mode (default disabled)
 -s           Show status at termination on stdout
 -i           Interactive mode
 -u           Disable adaptive partitioning
 -l           Set scheduling strategy for partitions (default FREETIME_BY_RATIO)
 -A           Activate new interpretion of aps partitions for subconfigs
 -S           Load early syset library
 -O           Options for presyset library
 -W           Load early wakeup reason library
 -B           Specify background partition (name|id)
 -P prio      Activate spawn boost with configured prio
Examples:
starter -c filename.cfg -v &